ES Vinyl and Craft Ltd
Ouija - 24oz Snowglobe Wrapper Kit
Ouija - 24oz Snowglobe Wrapper Kit
Couldn't load pickup availability
✨ Introducing the Wrapper Kit by ES Vinyl & Craft ✨
Make decorating your 24oz Acrylic Snowglobe simple with our coordinating Wrapper Kits.
Printed in-house by ES Vinyl & Craft Ltd using our professional Roland UV printer, each kit includes pre-cut vinyl pieces to create a beautifully coordinated cup. Simply weed, apply transfer tape and decorate, no cutting machine required!
Whether you’re new to vinyl or an experienced crafter, our step-by-step instructions will guide you through the process.
🌟 Base or Peekaboo—Which Will You Choose?
- Base Kit – A full body wrap for a bold, all-over design.
- Peekaboo Kit – Features additional sections to weed out, allowing more of your glitter or mica to show through.
✨ Two Beautiful Vinyl Finishes
- White Vinyl – Oracal 651 Glossy Permanent Vinyl for crisp, vibrant designs.
- Holographic Vinyl – Teckwrap Holographic Rainbow Silver Permanent Vinyl for shimmering rainbow reflections.
Your Options
- Base Kit – White Vinyl
- Base Kit – Holographic Vinyl
- Peekaboo Kit – White Vinyl
- Peekaboo Kit – Holographic Vinyl
Find your matching cup here:
📸 The holographic finish is even more beautiful in person! See its rainbow shimmer in action on TikTok: @teckwraptime.
🛠 How to Assemble Your Wrapper Kit
Tools You’ll Need
📦 What’s in Your Kit
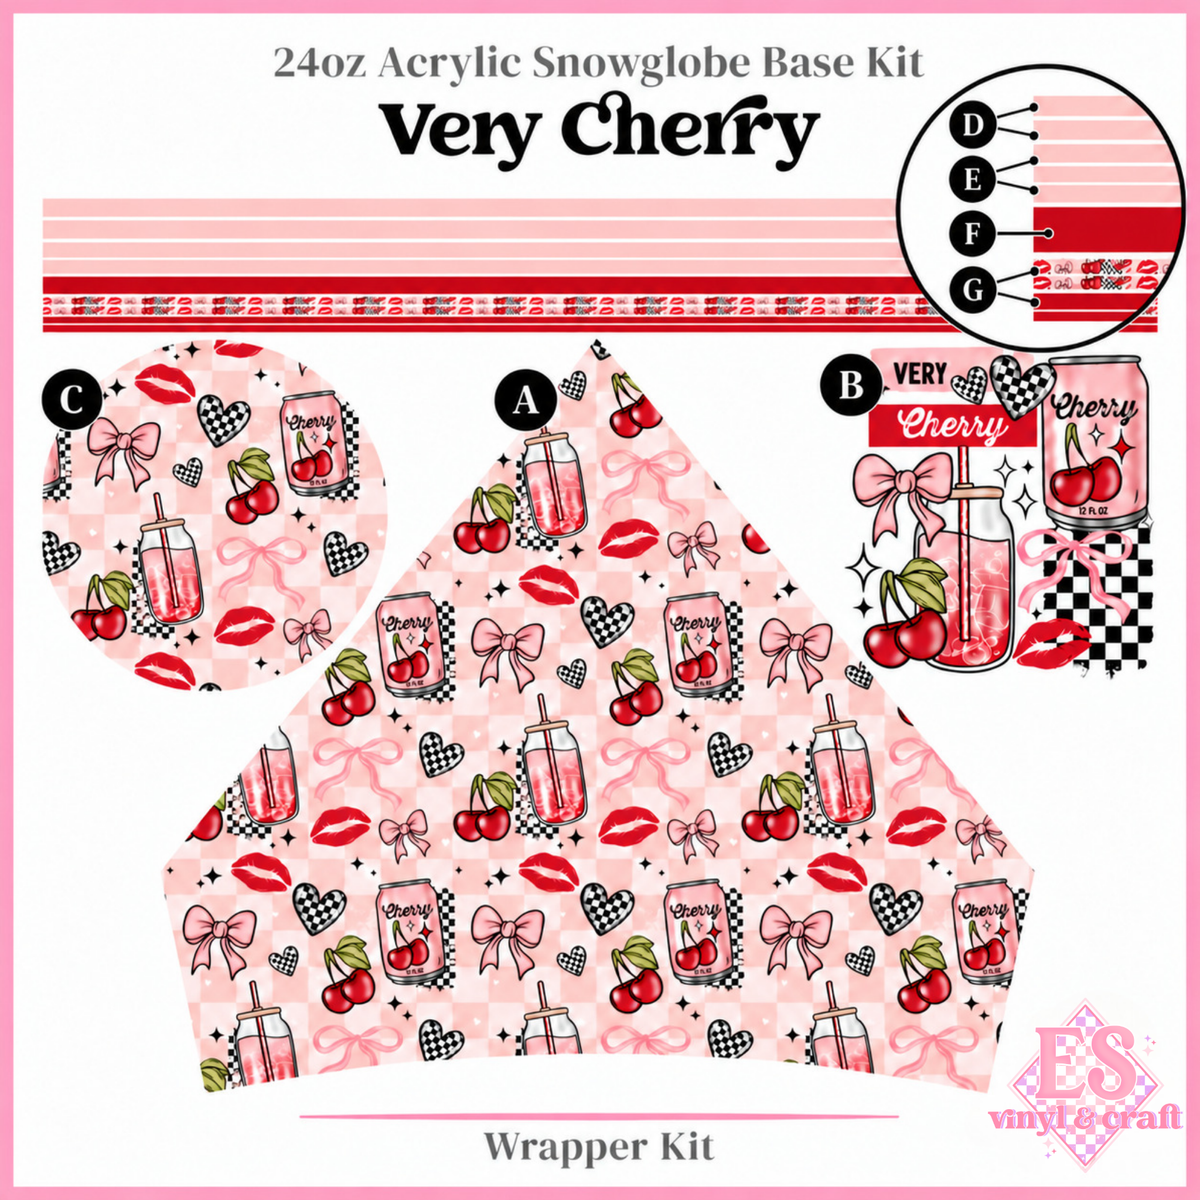
Use the labelled image on the listing to identify each piece:
- A – Body piece
- B – Decal
- C – Lid piece
- D – Top and bottom pinstripes
- E – Outer V pinstripes
- F – Lid pinstripe
- G – Inner V pinstripes: patterned or plain options
📝 Step-by-Step Instructions
1. Weed Your Vinyl
Your kit arrives un weeded.
Use tweezers or a weeding tool to carefully remove the unwanted vinyl surrounding the kit pieces, leaving the pieces labelled A–G on the backing sheet.
If you’re unsure which sections to remove, refer to the green weeding guide image on the product listing.
Check B (Decal) for any small areas that need weeding, such as spaces between letters or design elements.
For Peekaboo Kits, also remove the inner sections shown in the weeding guide so your glitter or mica can show through.
2. Apply the Body Piece (A)
- Apply transfer tape over the body piece and lift it from the backing sheet.
- Carefully line it up on your cup.
- Smooth the vinyl down with a squeegee, working gradually to minimise bubbles.
- Slowly peel away the transfer tape, making sure the vinyl stays in place.
Take your time when aligning the wrap. The coordinating pinstripes will help disguise small imperfections along the edges.
3. Add the Pinstripes
- D – Top and bottom: Apply around the top and bottom edges of the cup.
- E – Outer V: Apply along the outer edges of the V split.
- G – Inner V: Choose the patterned or plain strips and apply along the inner edges of the V split.
- F – Lid: Apply around the edge of the lid.
4. Add the Finishing Touches
Apply B (Decal) to your cup and C (Lid piece) to the top of your lid.
✨ Your ES Vinyl & Craft Wrapper Kit is complete—time to admire your creation! ✨